Blaf
-
Posts
326 -
Joined
-
Last visited
Content Type
Profiles
Forums
Downloads
Gallery
Everything posted by Blaf
-
Sounds nice to me too....eventhough when Aluminium is to be ground, they suggest to do it with addition of some Stearine as to coat particles with protective layer and supress oxidation. Maybe this works for Magnesium too, never tried myself, though. Blaf
-
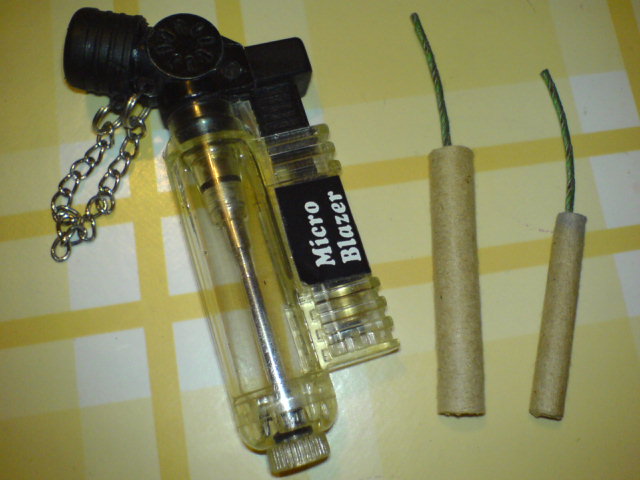
Those among you who saw my newest post on Flash Powder knew well I would make something to check it. And here you are – two crackers of the latest production, filled by KCLO4 / AL flash powder. They're photographed aside my notorious propane lighter for size comparison. The larger one is made of craft stripe wound around 6mm brass rod while smaller one is only 3mm inner diameter. Wall thickness is 1,5mm at both versions. Last evening, the smaller one caught some action. Namely, I took it to my balcony, light its fuse and thrown it at some 10m from me. After approximately 5 sec. It gone off with pretty loud and sharp BANG and unfortunately, triggered an alarm in nearby video-game store! I retreated, angrily complaining about stupid kids that started firing those things earlier this year. That's for my neighbours sake, of course... Overall, this flash works beyond expectations! Blaf

-
Ah, you remember humble me? Thanks for giving me hope... Yes, the quantity of flash I made for the trial is expressed in grains, not grams, it can only fill the botom of a tea spoon. Do not worry, caution is my middle name. Blaf
-
Helo guys Long time no hear from me heh? I confess, I neglected this hobby in favour of other aspects of my life. And here, the story goes... So far I've been using Potassium Permanganate flash, when I needed it, that is. Recently I ordered some chems from...mumble, mumble, mumble...and among other beauties, I've got Potassium Perchlorate and what else but German Dark Aluminium. Mixing those two gives the best flash I've ever witnessed in my ignorant life. The ratio by weight for this flash is well known, 70:30 (Perc:Al) which makes innocently looking gray powder. But even a smallest pile I could scoop and set off produced an audible "thump" instead of low "whump". Blind spot remained in my eye for a few minutes. One small cracker is made to verify in practice final quality of the product but it's not fired yet, which means – report follows soon. Blaf p.s. See my last posts in Pyro devices / Firecracker topic
-
Hmmm.... Deadman my Man, I have to say this: "Stay greeen" expression sounds familiar from somewhere else... Am I right? Blaf p.s. Do not take this as an act of war, please.
-
Hello guys! Of all devices you can see on the previous pic, one third was fired in New Years night as an ouverture to much louder show in the city port. The rest of gadgets was taken with me last saturday to my cousines wedding party. And you guess – kids gathered around me asking tricky questions, how did I do this or that, where the fuse came from etc. I played a wise old man, head of the Pyro Tribe and said nothing. It has to remain magical craft to a certain degree and I just wisely smiled and relied them to Internet. That much about aura I had that night. As for reliability of my handworks, well, 90% worked as planed. That tiny percentage of faulty ones did not spoil the night. Precisely, a few jumping-crackers did not discharge completely and some segments survived intact. The problem could be too tight spiking. Triangular ones and various rockets all worked perfectly. Ah, you should have seen children faces while rockets were rushing up. It's worth every single second spent in production. I see no stories posted from you other members of this noble forum. Are you trying to say that you've done nothing this time? Blaf
-
Hello Nitroglycerin As far as I can see, you've developed a strong high-explosive addiction, have you? Sorry, but even just mentioning those horribly sounding titles gives me creeps. OK, different tastes shouldn't be discussed. Personally, I prefer much simpler fun with harmless pyro gadgets. No more explosives should be mentioned here, OK? Maybe in a new topic or so. No offence, heh... Anyhow, good luck with whatever you set off these days! Blaf p.s. Thanks for nice feedback!
-
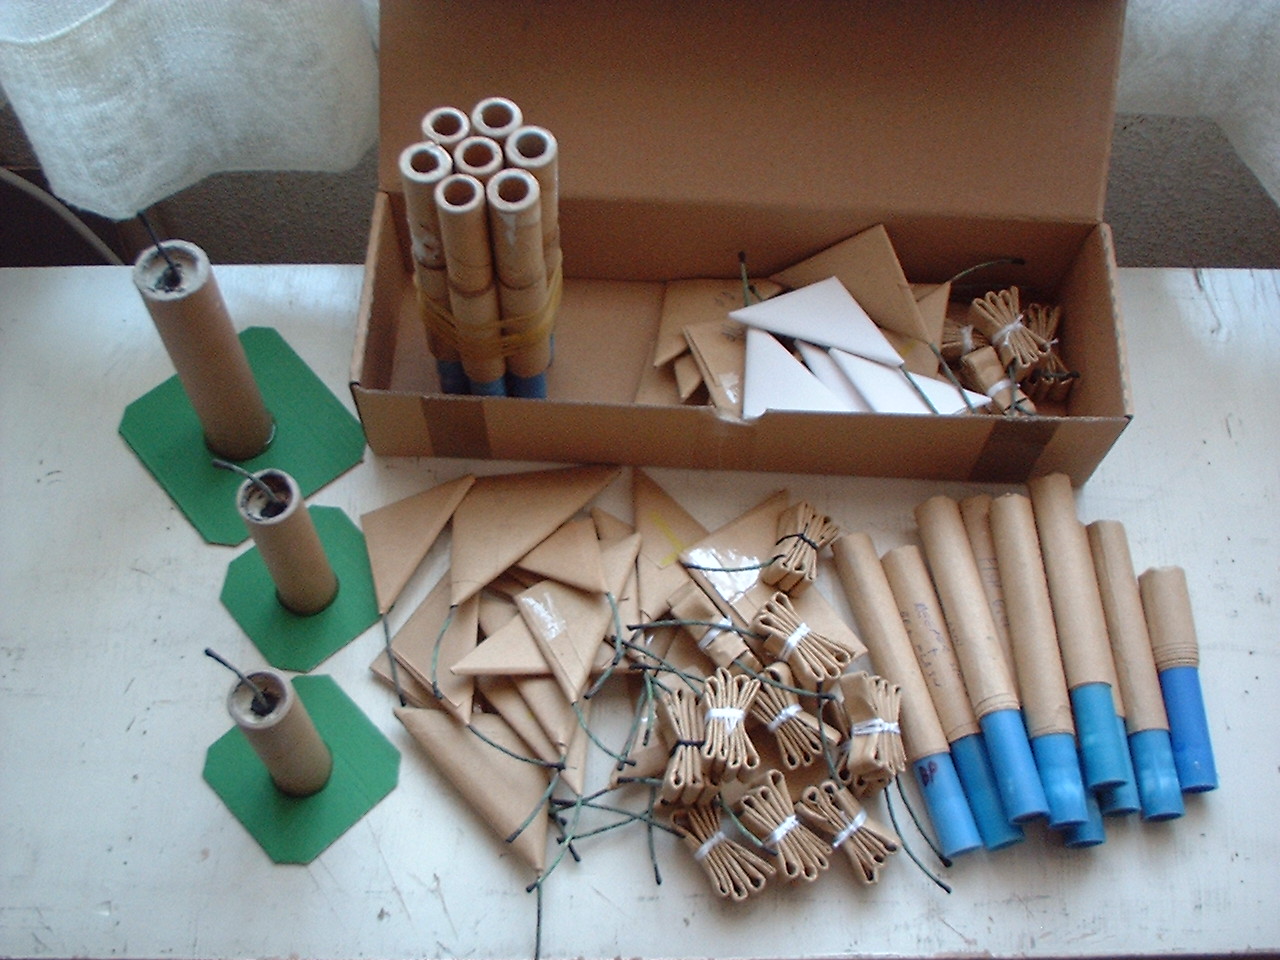
Here we go... As you can see, I wasn't just sitting with my hands crossed. I made all those small devices in last two weeks. It's nothing that you haven't seen yet, just the new fuse batch has been made. It is more compact and that's all. I know some of you envy me about that one and I can say just one thing – drop dead (he, he...). Let's go back to the image; Far left – threee fountains. You know the drill, KNO3, charcoal, sulphur and Al. One of them is almost twice bigger than other two and God knows what will happen when It's lit. Then, we have that cardboard box full of stuff. Left are aerial salutes (no stabilizers attached yet), the rest is well known pile of triangles and jumping crackers. Yes, I made a few of white office paper...how it sounds is yet to be heard. In front, the same stuff with addition on the right, rockets with various loads. Nothing spectacular, just a few stars of this or that kind and that's all. Or perhaps a small cracker among them to spice it up a bit. More than half of everything goes to my cousines sons, I'll maybe keep a few triangles and that's all. Hope everything works well at the amusement of those two, hungry for pyro all the time. Anything worth seeing on your side? Blaf
-
Mass production? What mass production? Blaf
-
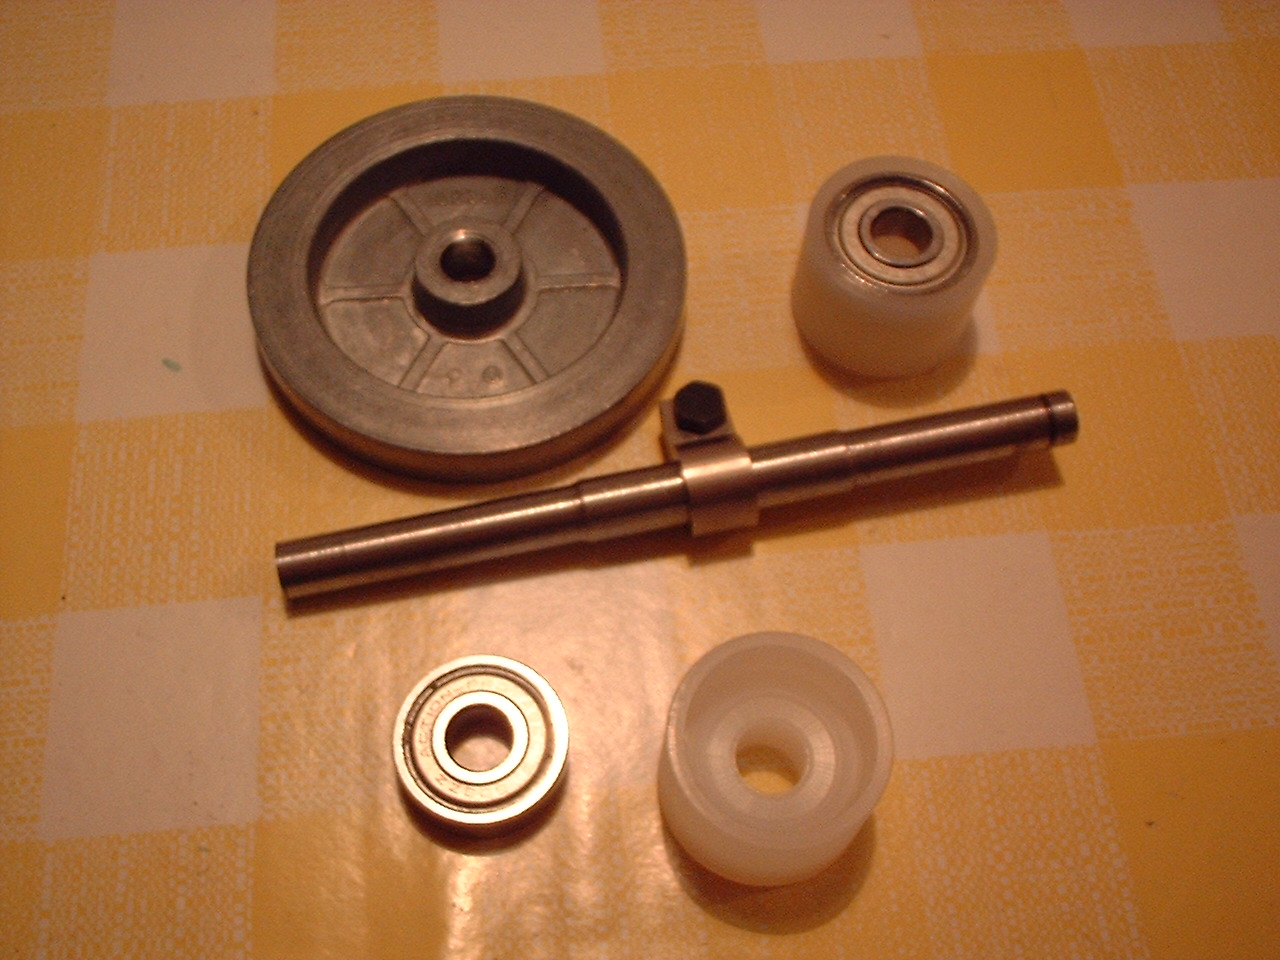
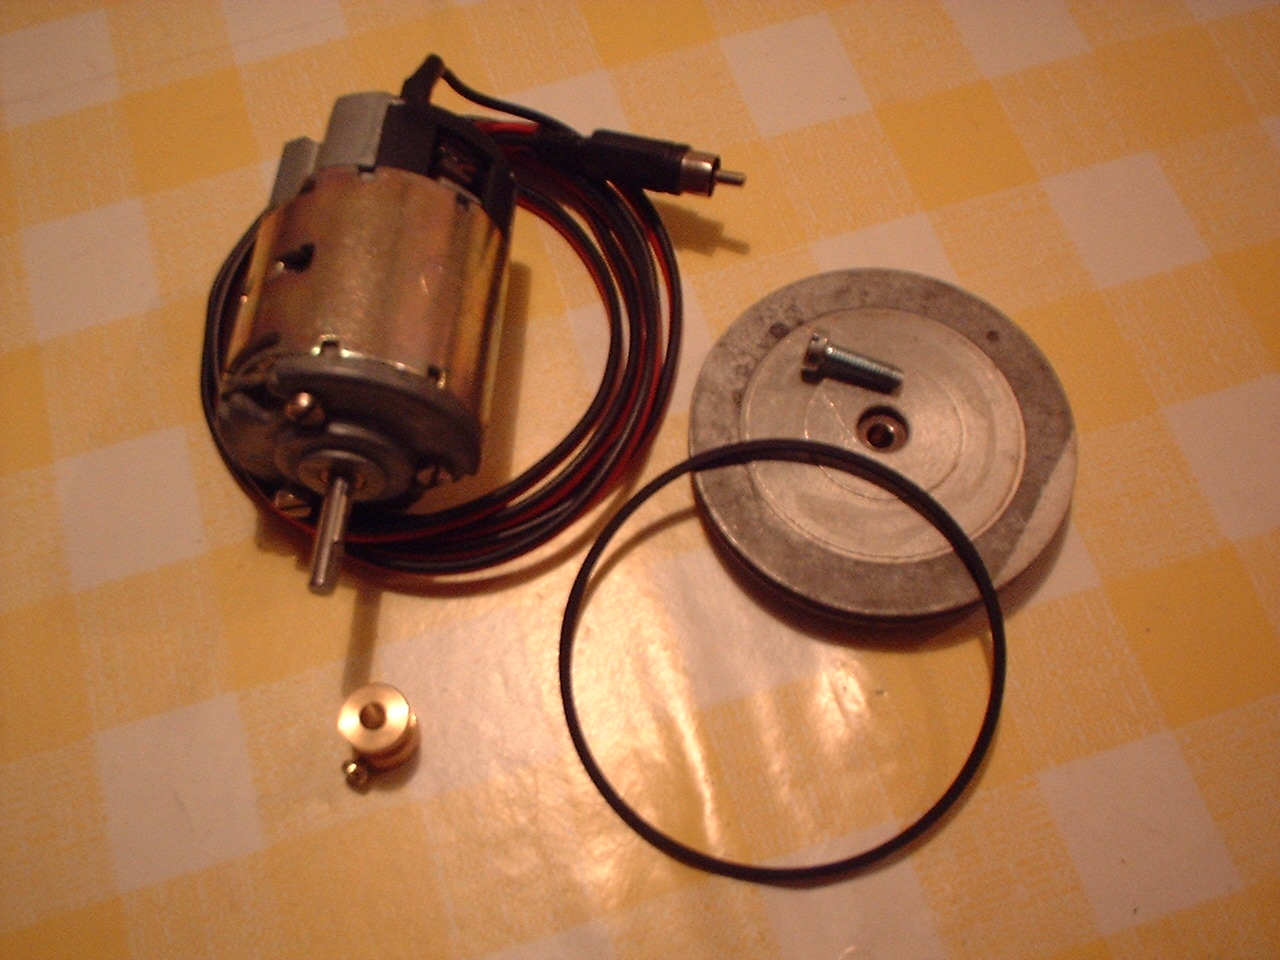
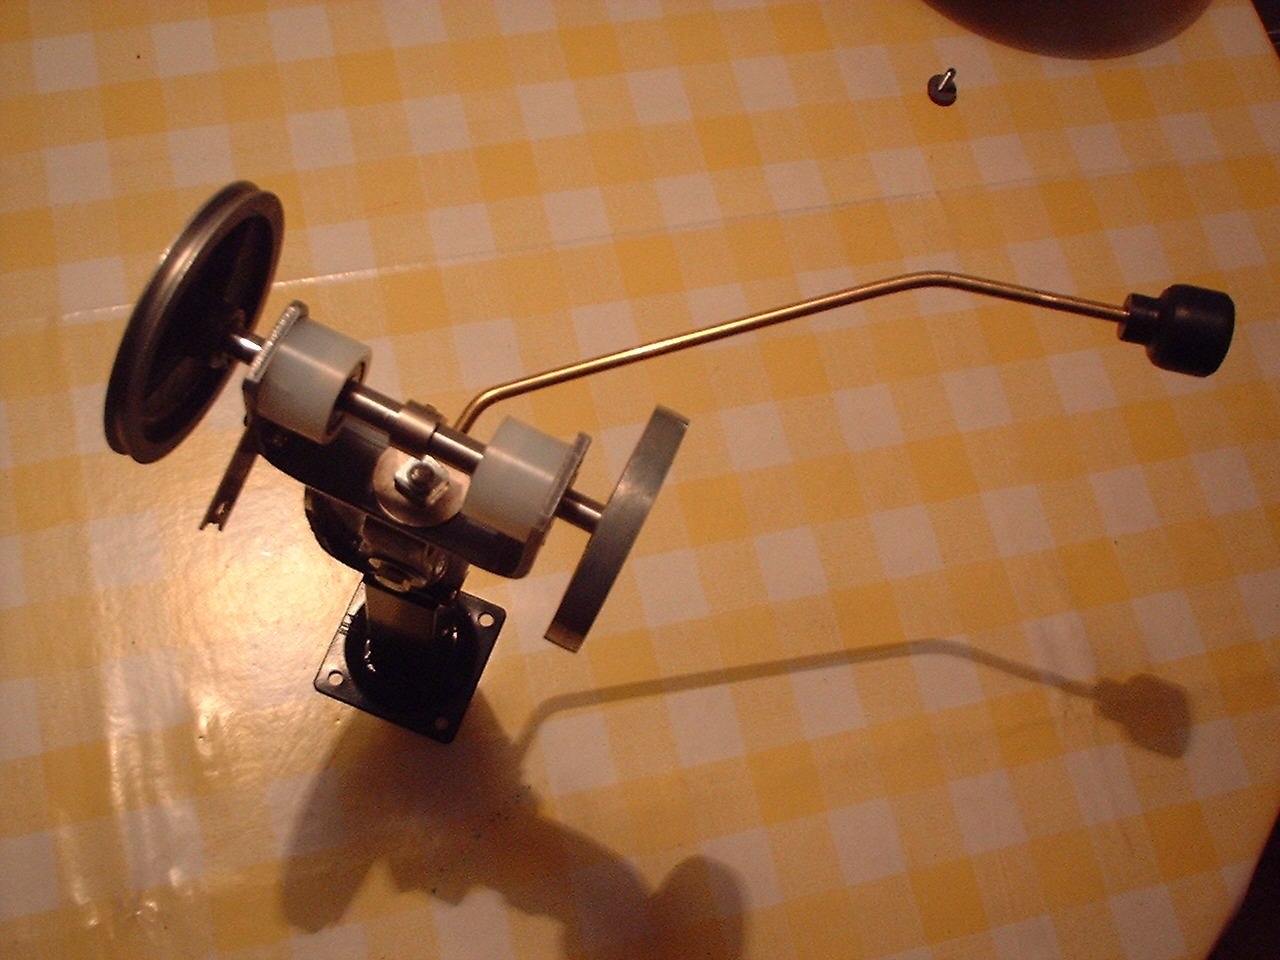
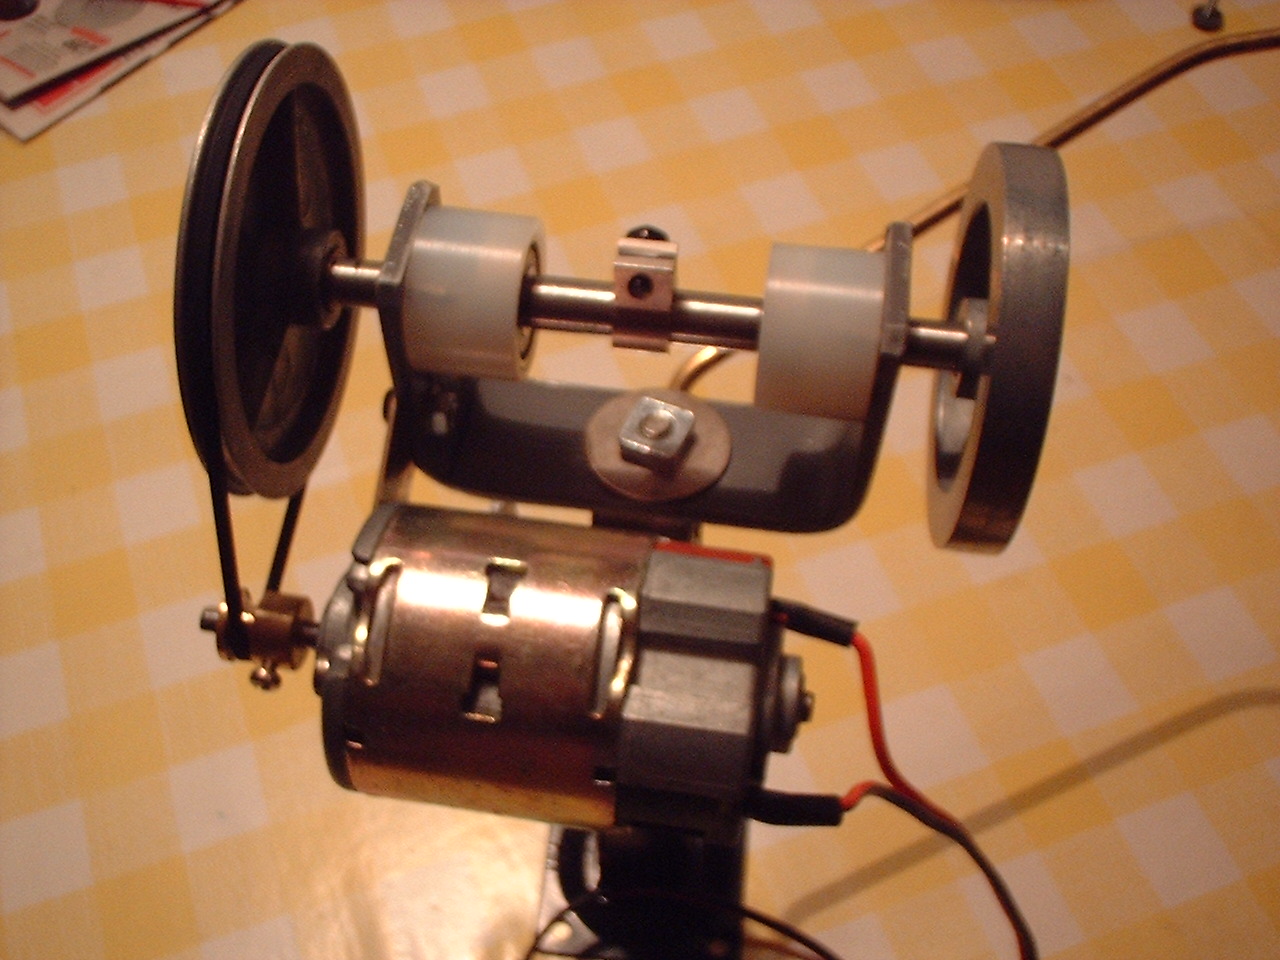
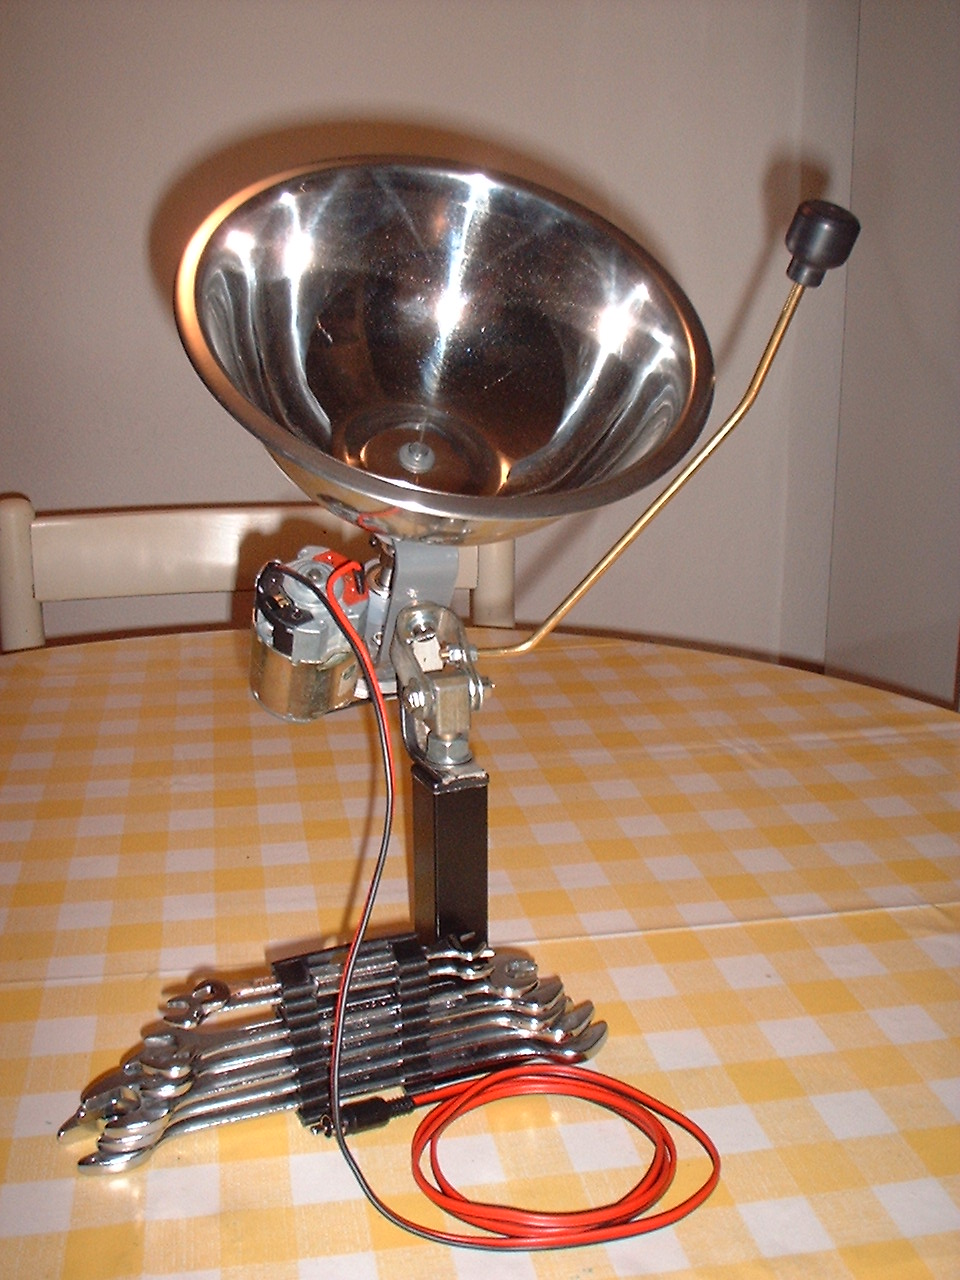
Hello guys! Here we have a nice and simple (people got shot for far less than this...) piece of tool. And again, I started from scrap and purchased only an Inox dish and base. So can you too. First, the base - the black square stock with wider bottom. It is simple table leg which I cut to approx. 15cm lenght. Setup on the left is swinging joint which goes screwed on top of the base-leg (long brass arm with black plastic tip is swing forward/backward handle). L shaped piece of Al on the bottom goes under swinging joint and acts like swing-stop. Those are pieces of the ABS plastic frame which holds bearings and main shaft. Screw and washers are there to tighten the frame to the swinging joint. As simple as that... Talking about bearings and main shaft – here they are. These are cheap bearings I bought a few years ago, dozen for 1,5 Euro. I made nests of milky PVE bar, bearings go tightly in and then main shaft is being slid through. Funny thing in the middle of shaft has no specific purpose than being useful when screwing drive pulley and fly-wheel...but more about it later. Here we go with motor setup. It is 24V DC motor, God knows from where. A friend of mine says it should be from an older PC printer or something. I do not really care as long as it works good. Which it does. You can also see the back drive pulley, rubber belt and a small drive pulley which goes on motor shaft. I made it from brass stock on my micro-lathe in a few minutes. This is how it looks like half-assembled. No motor and no rotating dish here yet. Here comes the motor – it is brush type of motor and gets fastened to piece of brass held by two screws on plastic frame. It hangs on one screw only but for this kind of setup it holds quite fine. Round plate on the right is not a pulley, it is fly-wheel and its purpose is twofold. First – it gives more support for dish which comes screwed on it. Second – it's meaty piece of alloy heavier than Al and helps to retain inertia. And finally, his majesty – the Roller. Set of keys are there to keep it in balance, that's all. No secret mission for them this time. Now, at 12V DC the dish (thin Inox made in China, 21cm in diameter) spins too fast so I use regulated power supply and at some 6-8V it works fine, rotating at 2 revolutions per second. But, the thing is – I haven't tried it yet!!! My experiences will be posted here, of course... Blaf
-
Hello all! I've just made a new and larger upper die. The white stuff I made it from is 25mm dia PVE bar faced and turned on my micro-lathe machine. It looks aesthetically much better than wooden one I used before. Besides, visual control of flow of the powder is much easier now as I can see better what's going on. Lower one is also new. There's no real need to change it but I made it for bare visual harmony sake. Unnecessary changes, heh? Anyhow, I enjoyed working on it... Blaf
-
Thanks Deadman for your positive feedback. And yes, that's the fuse I get from my machine but with addition of primed ends. And it works great. Blaf
-
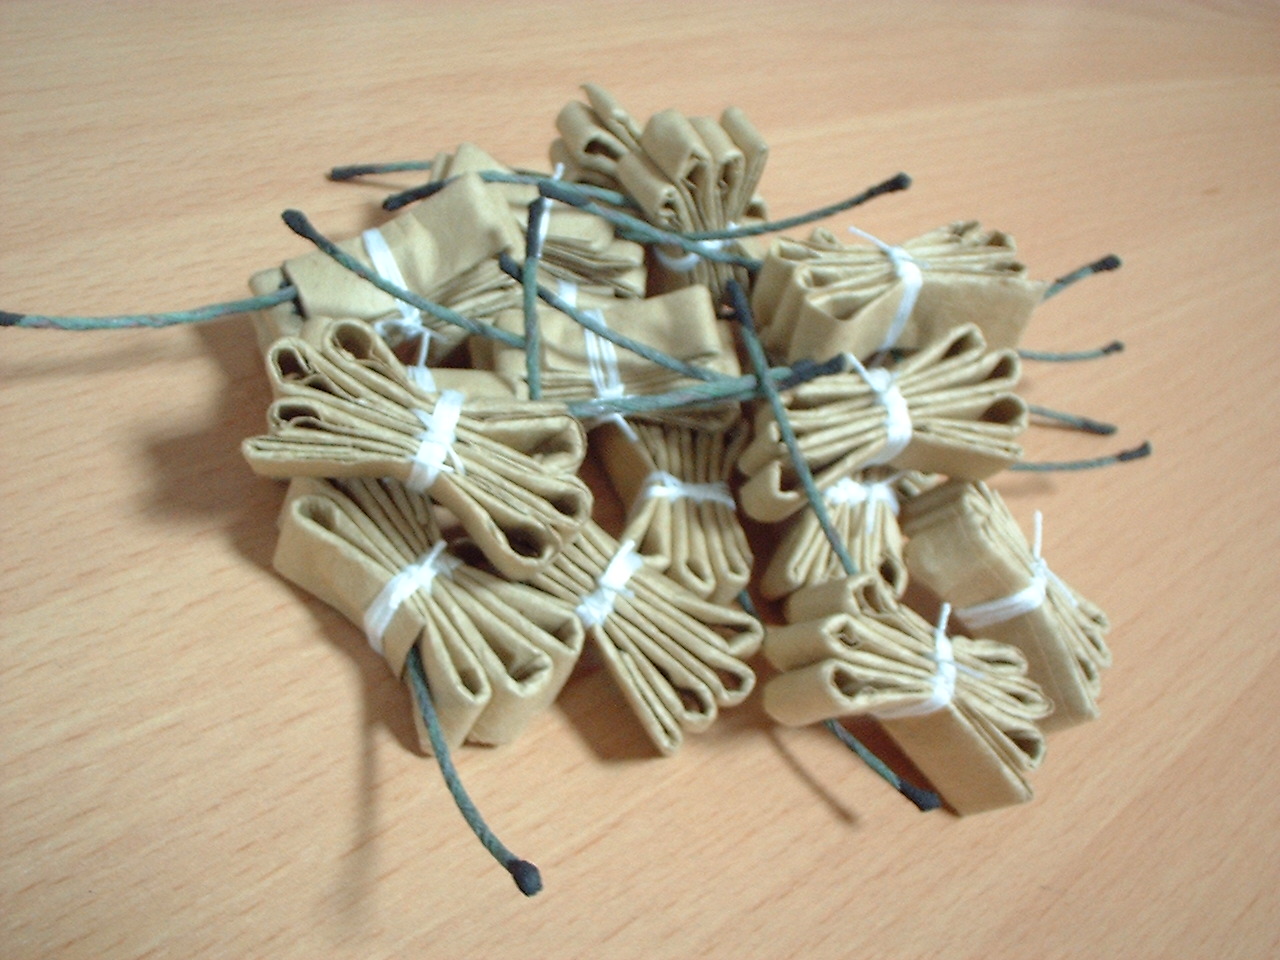
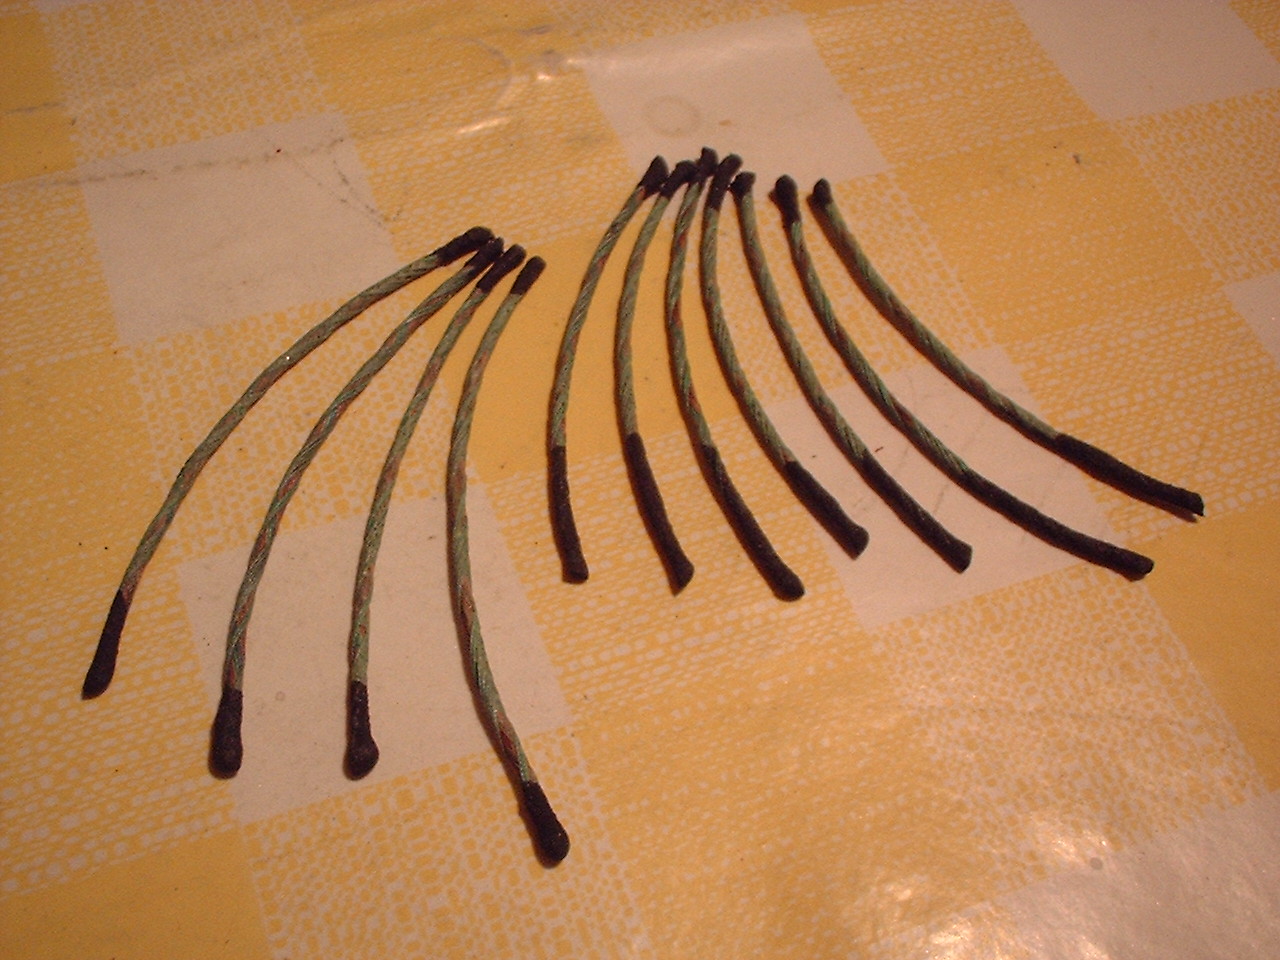
Hello there! As we're talking Visco (exclusively) here, I'm adding an image of my homebrew one but primed for ease of use. Both ends are primed with Meal+Dextrin slurry, some of those have one end dipped more - this is for use in BP rockets. You can only guess about other uses... Blaf
-
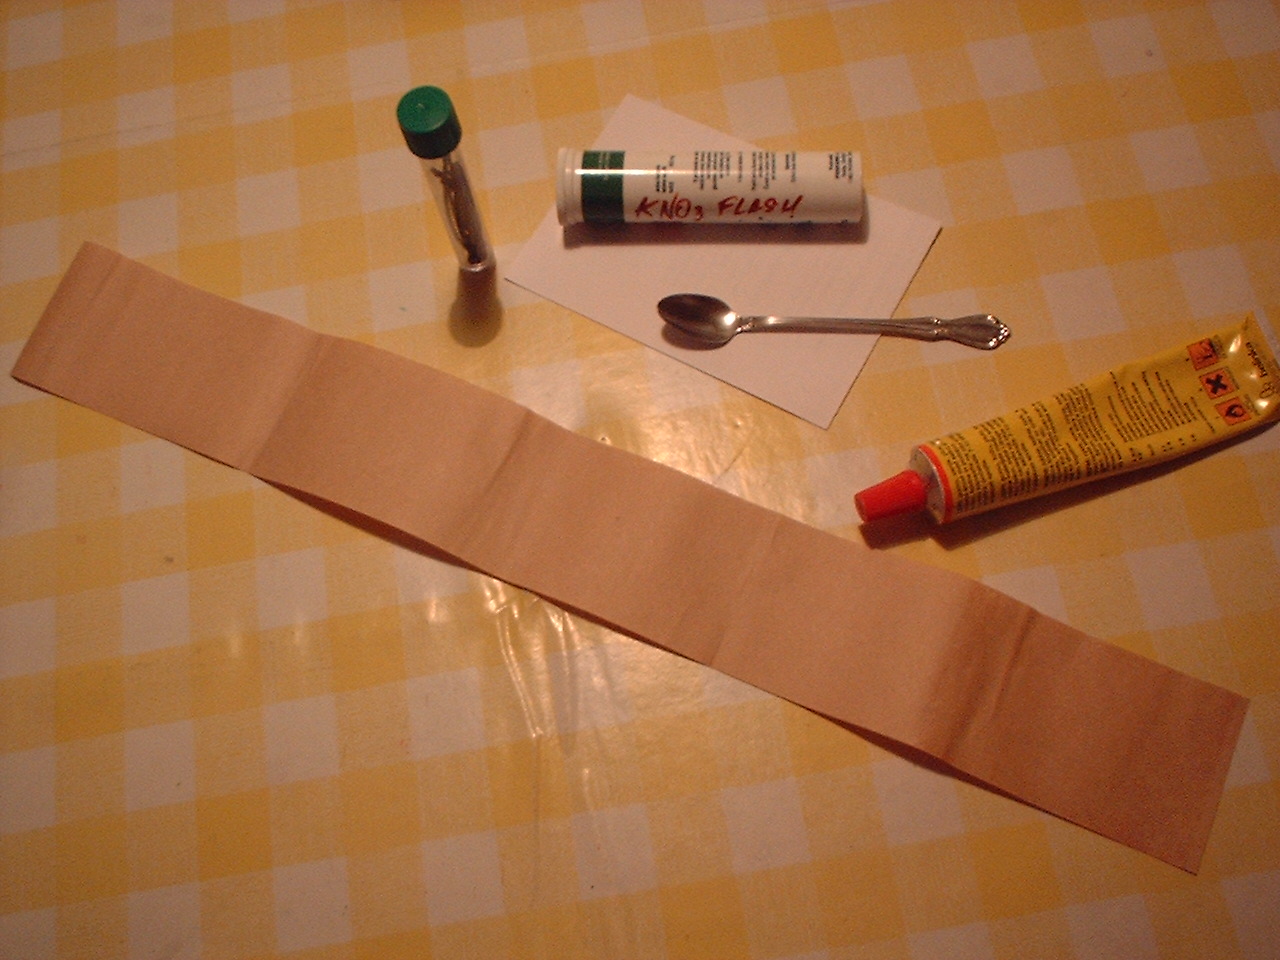
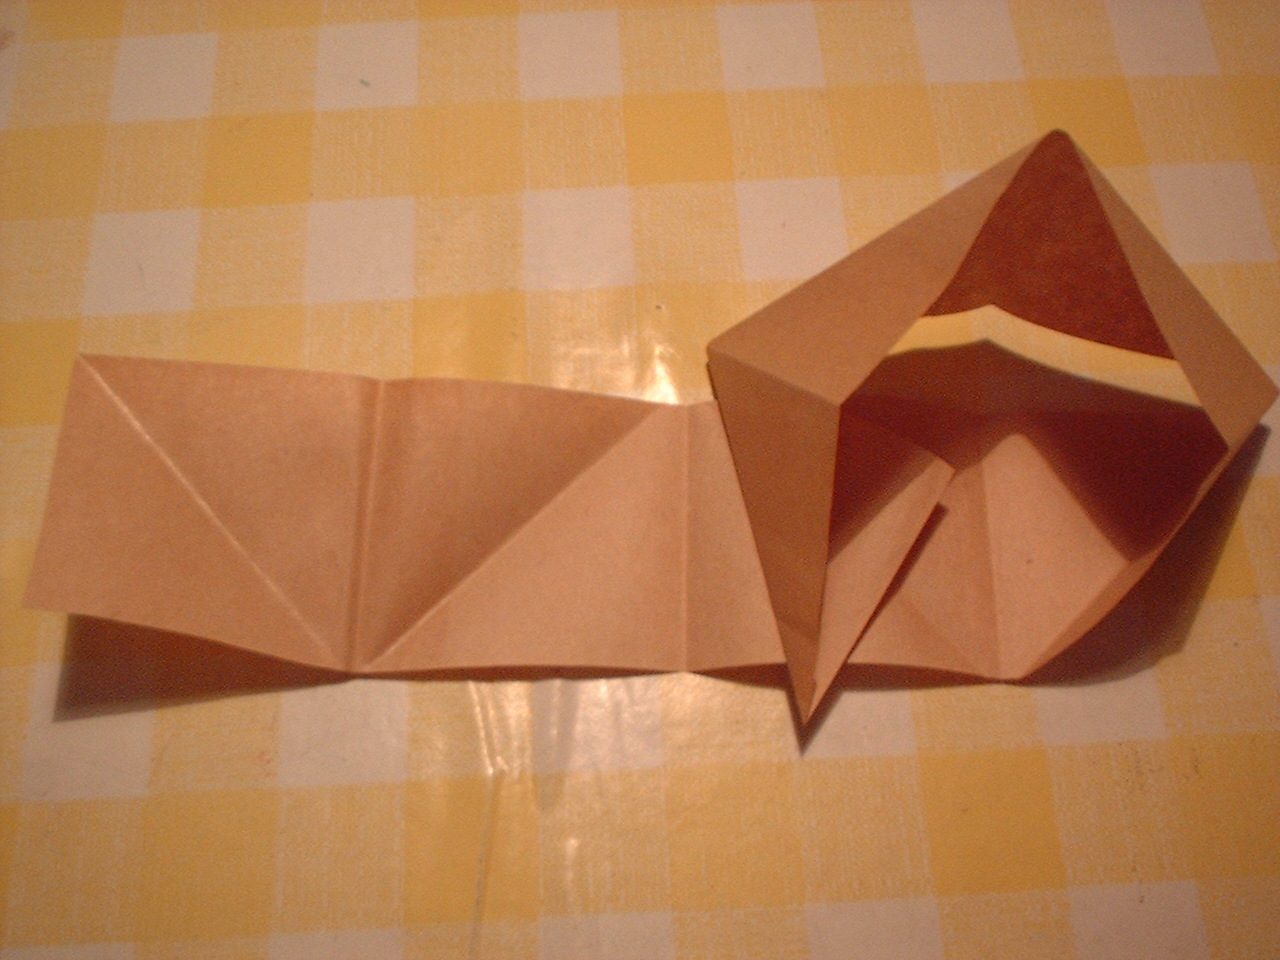
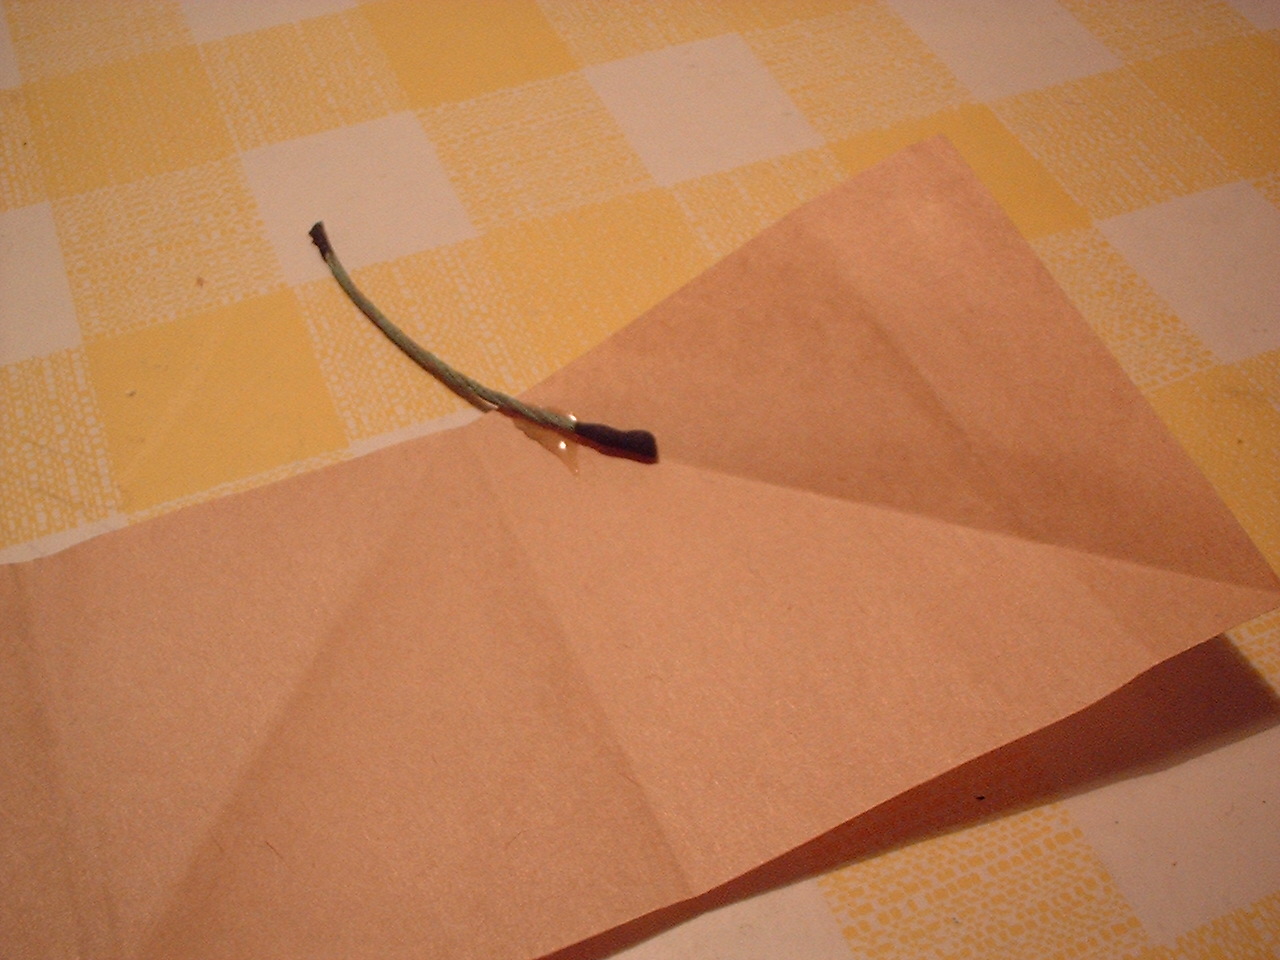
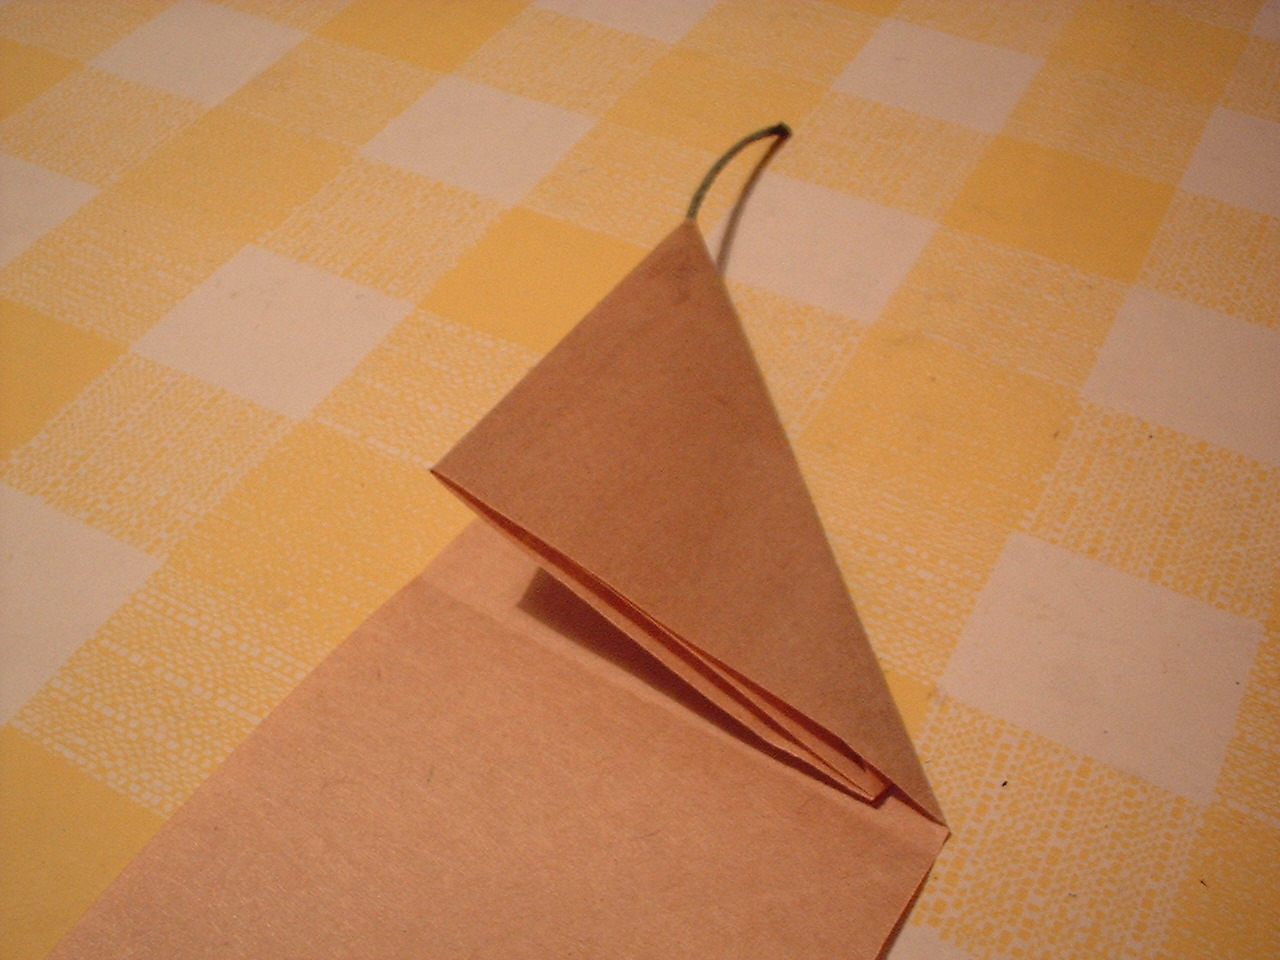
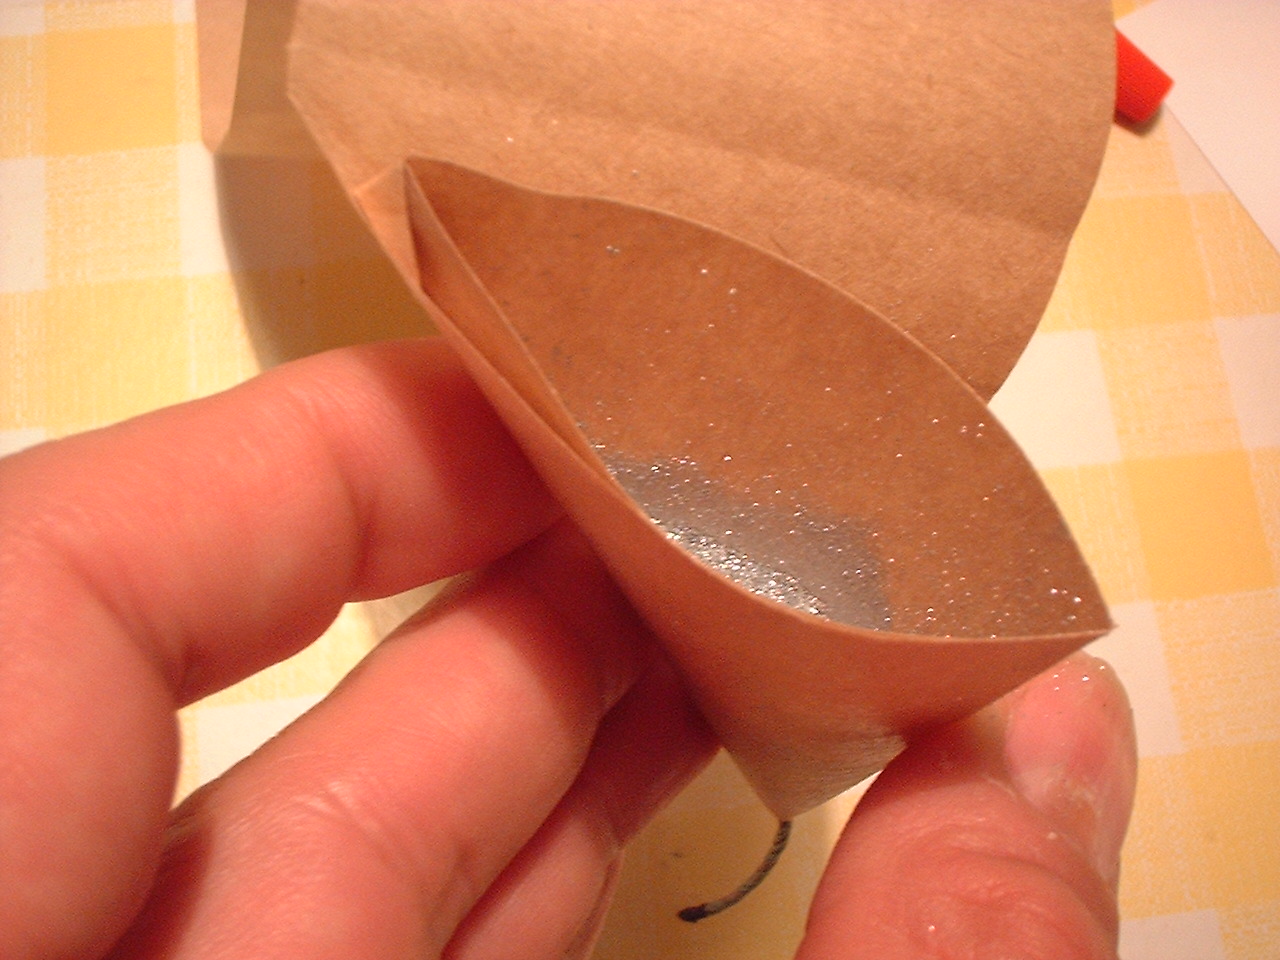
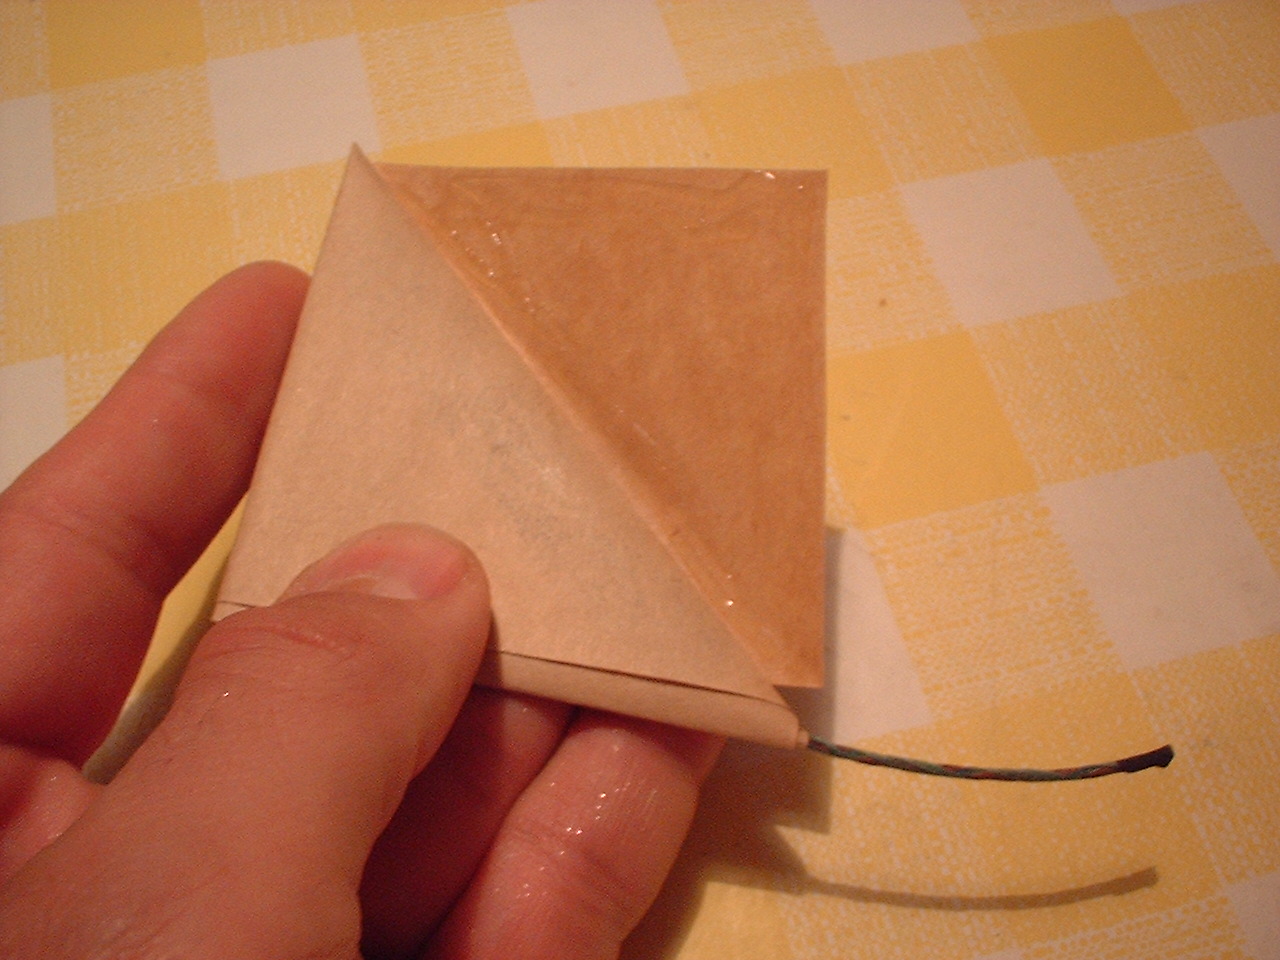
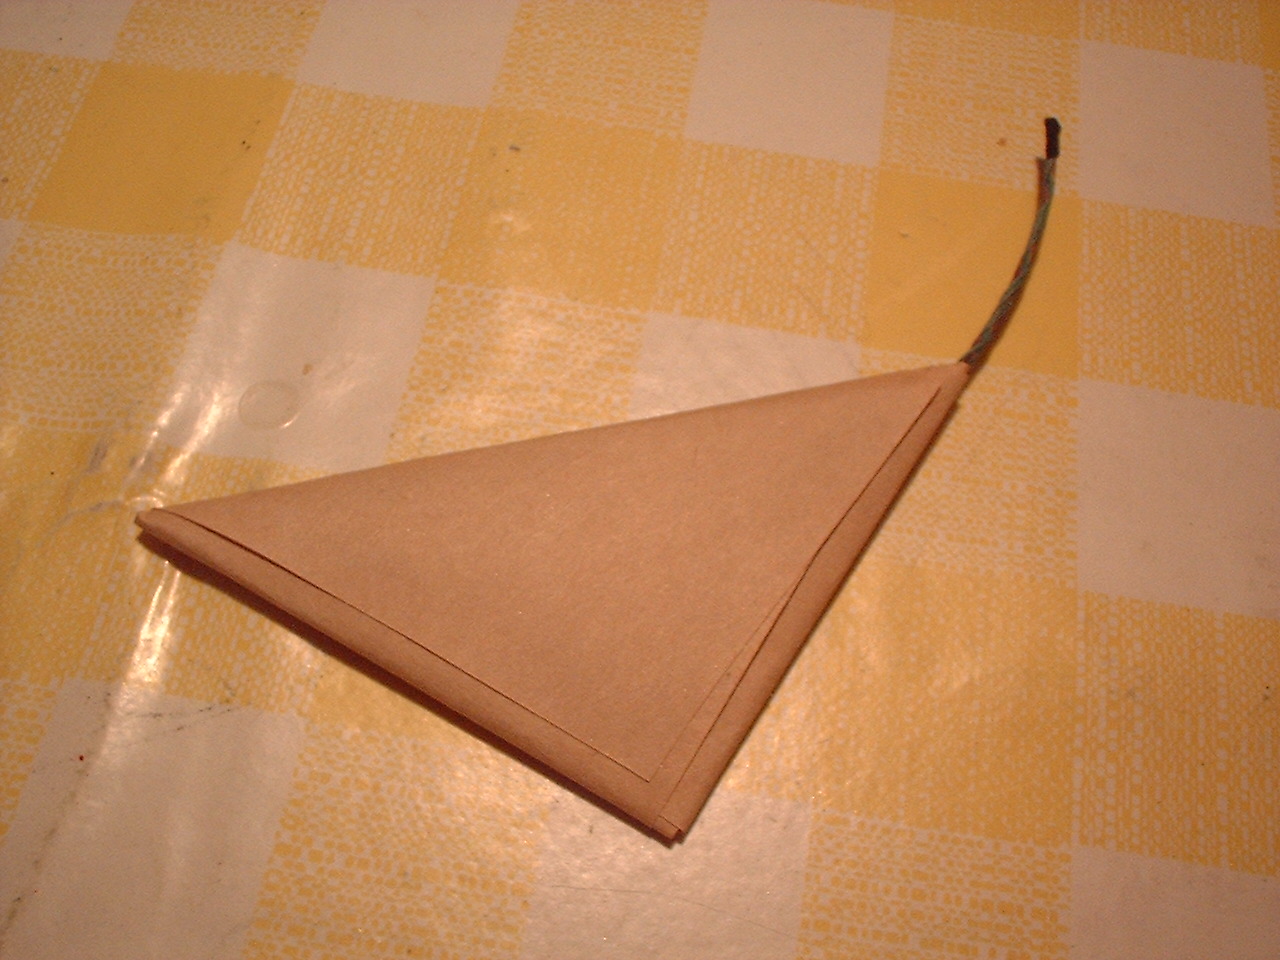
Here is how I did it: First, see what do we have to get to complete Triangular Cracker. I believe you're all agree with this term – it clearly depictures what we're talking about. We need craft paper tape, approximately 50cm in lenght and 7cm wide. You can play with these measures at will, just don't make them rediculously big (and loud). Tea spoon comes handy as well as neoprene glue. That white plastic tube lying on my desk contains small amount of KNO3 flash, not so energetic but quite useful. Plastic epruvete with green cap contains precut pieces of my Visco which are primed at both ends. Lets get down on it... Next we should do prefolding - it makes folding device easier later. It is simple triangular folding like American flag is folded in some grim occasions. Piece of Visco is then positioned into one sharp end with dab of glue to keep it while folding. Another reason of using drop of glue here is sealing the pocket so that fine aluminium dust doesn't come out. Just a few foldings should be done first so that pocket stays open at one end... Now, pocket can be filled with one small tea spoon of flash. See how it glitters inside? Keep folding the tape carefully so that flash doesn't spill and use glue at each folding to reinforce bent tape. Interestingly, when this goes BANG it cracks at both short sides, long one stays undamaged. The end fold is glued... And there we go - finished beautiful triangle. Tell me, how do you like this one? Blaf
-
Hello guys! Have you ever seen those triangular shaped crackers elsewhere on Net? No? Well, I've just made some and they're pretty nice. They also go BANG, not too loud though. But let me be quiet for now and hear what you have to say... Blaf
-
Hello Tyneman Before I tossed saw-dust into tube, I poured some additional BP to fill the remaning gap between tube walls and star. When they (top of the star and filler BP) were more or less leveled I poured half of a tea spoon of saw-dust and pressed it with wooden ram. It worked really nice, just maybe the thrust was too strong for this size of the tube. Blaf p.s. You're right, no pictures were taken but next one will be reviewed for sure.
-
The last production Candle, made a week ago was 100% successful. This time I used long piece of fuse (domestic brand, of course) which was placed along inside cardboard tube of 10mm dia and 20cm in lenght. A Bentonite clay end plug was rammed at depth of 7cm so that 12cm remained for load. Then, generous toss of BP topped by pumped star then 10mm thick layer of saw dust was then pressed in. The same drill was repeated 6 times in a row but each consecutive load of BP was increased a bit because the shorter the tube the more power you need to shoot the star. The last layer of saw dust was pressed with additional tissue paper end-cap and that's all. Each load was slightly, but just slightly rammed with rubber mallet. The tube was slid onto wooden stick of appropriate diameter, stuck between large gravel stones, slightly skewed to sea water line. The fuse protruded some 3cm from the tube mouth, I lit it and watched the show. Each shot blown the star well over 7 meters, in more or less straight line. Stars used: Golden & Silver Rain and Reeper Silver. They all worked perfectly with no blind shots with about 1-2 seconds delay between shots. Conclusion: I should make more of these.... Blaf
-
The last launch report: Look back to Mk3 skyrocket image – that's the one fired two evenings ago. I sneaked out in rather warm night, no moonlight, with slight breeze from south. My pockets and hands were all occupied with Mk3 itself, torch gas lighter, pocket LED lamp, spare fuses if anything puffs blind, duct-tape, stick stabilizer of 80cm....ah yes, aluminium launch tube. I walked away about hundred meters from my house to abandoned piece of gravel beach with no light at all. That's why I needed my LED lamp...city lights were glimmering on my right and I was feeling like the last Man on Earth. Perfect – if you ask me. My hands were shaking a bit while assembly process but everything was set nicely, slightly bent to the seaside. I thought, if something gone wrong, everything should have ended up in sea water. I lit the fuse and retired a few meters....it took off in a furious hisss and reached some 50-70 meters but then started to descend, still burning. At some 30 meters the load thumped and spread weak fan of stars. Note that star shell wasn't spiked or reinforced in any way so I expected weak burst. Anyhow, the rocket did not (and I stress this again – did not!) explode...which should be considered to be a success. Moderate, of course, but still. Any firings on your side guys? Blaf
-
Furnace would be best for melting metals. The one I'm deeply fond of has been described in detail at Mr.Lionel's site (http://www.backyardmetalcasting.com) and it's called "2 bucks furnace". It's made of refractory mixture of cement, silica sand, perlite and fireclay...or so. This furnace looks like two flower-pots touching each other with wider sides, has three holes all in all. One on the bottom for metal spills, one on the side for propane burner and one on top as exhaust hole. This little setup seems to be melting Al in 15 minutes time! Check it out, it's worth every second of your time... Blaf
-
Stay calm, your English is quite OK. As for your proposal, yes you're right. The fuel (flammable liquid) can be placed in sealed plastic bag and seated on top of the lift charge. This way your mortar stays dry and device can be fired by simple fuse or quickmatch. I have never tried to make one myself - not because it's too complicated but for safety reasons only. Blaf
-
This is not from my own experience but from real life reports from elsewhere on Net so don't take this for granted. Charcoal alone would not generate enough heat to melt Aluminium etc. It should be pushed a little – I mean additional air supply should be provided. Some sort of blower, air-turbine or so. This would keep the charcoal at its peak temperature and surely melt light metals. This should be done in closed furnace, not on open air. Your mothers clay oven sounds nice but you'll have to take the melting pot out every time you want to stir the mixture. And since the door is positioned sideways, if (I'm not saying it will) the alloy starts to burn, it will be impossible to react immediately. As for melting itself, Aluminium should be completely melted first and then Magnesium goes into mix. Blaf
-
Well, I think we could adopt "In line Fuse Machine" or "Tower Fuse Machine" as official name of the design. I'm glad to see so many of you building your machines or at least considering to start building one. I'm eager to see how your variations are going to look and work so get down on it guys! And if any of you needs additional images of any detail of my Machine, do not hesitate to ask for and I'll post it. Blaf
-
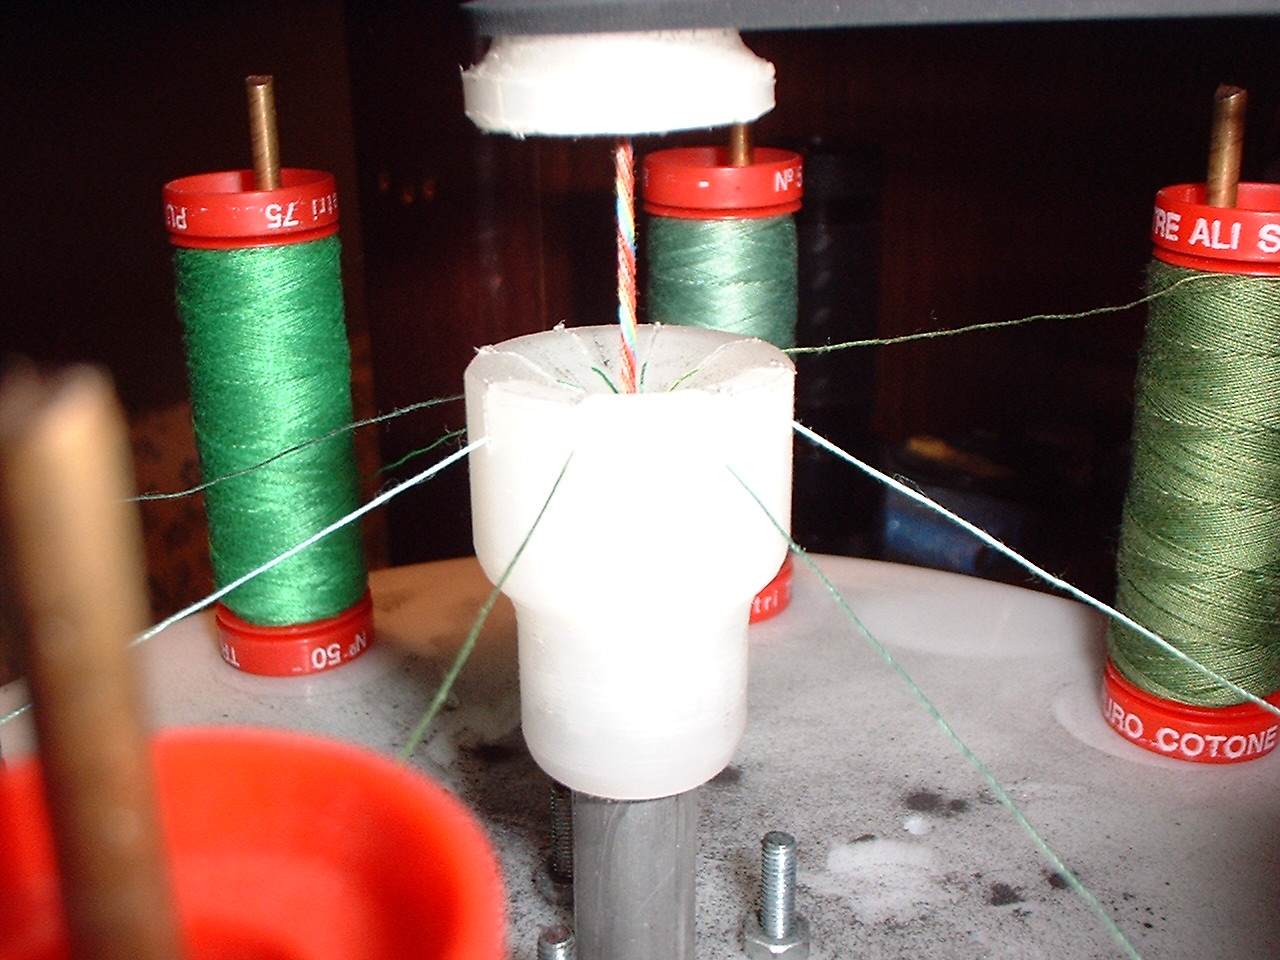
Hello Julicher Sorry, I disregarded this comment of yours somehow so here I am to clear this point up: You're right, first winding of fuse goes through second plate but this time vertically up. This is little confusing - how the hell additional yarns are counterwound around first layer when spools are still standing upwards? Secret is in little detail (which can't be seen on photos) of the second die design. This one doesn't have funnelled hole on top, ok it's holed through but yarns do not enter it due to small recesses like in first die. This one has little holes drilled through its body, somewhere below its rim so that additional yarns are pushed through to meet at the same point inside the die and now, they all go straight up. Hope it's clear now. Blaf
-
Hello SoulPredator As far as I can conclude from your report, something is definitely wrong with your machine. Powder spills and loose strings suggest one of the following: Check the hole on the powder die (first rotating plate), it should be properly dimensioned so that all first 12 yarns go through it freely when being stretched. Here, a piece of straight wire or fishing line of 1mm (It's expected diameter of the powder core) thicknes comes handy - just pull it through the die along with those 12 yarns and it should still go smoothly or with just a little friction. Another problem (and cause of deep grief) to be considered is adjusting the rotation speed of two plates in relation to rotation of the collecting drum. I can't give you any advice in this regard as this is simple matter of trial and error. But generally, too much speed on the plates side and yarns are wound at steep angle, which makes fuse too thick and it gets stuck inside powder die hole. Remedy: Decrease rotation of plates or increase rotation of the collecting drum but you've already concluded this. Just to be sure – powder die should be funnelled and small recesses cut for each yarn all around the rim so that threading is made symmetrically. Your machine uses pulleys below each rotating plates, right? Yarns are collected under first one and horizontaly directed to pulley under second rotating plate where it goes straight up through the second die. Those pulleys have to be nicely alligned with holes in each die. Too much talking, heh. Just don't give up, OK? Blaf
-
Ah, it fulfills me somehow. If you use those cotton yarns be sure to size the hole in second die accordingly. I'm saying this because if those are ment to be candle wicks, they should be pretty thick for the purpose... Just keep the project going! Blaf